Everything you need to know about our new bike features
By Anna – 4 February 2022
We have recently upgraded our bikes in our West and Enge studios. We wanted to deliver the best possible quality and make sure your riding experience will be the smoothest it’s ever been, so we went for the Stages Studio bikes. In the blog post below you’ll find out exactly what’s new and how to use the bike features so you can have the most effective workout.
SETUP
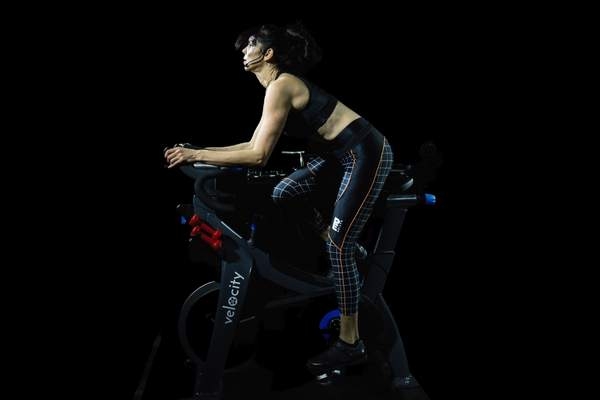
Perfecting your bike setup is important, so you can be comfortable and safe while riding. While it ultimately all comes down to personal preference, there are some things to keep in mind:
- The saddle should be around your hip level and the distance between your saddle and your handlebar should be around forearm length (plus a few centimeters).
- Adjust the saddle height first and hop on the bike to check it. Make sure when your foot is at the very bottom that your knee has a slight bend to it and it’s not fully extended.
- You can also check and bring your knee up to a 90 degree angle – if your kneecap is directly above your toes, you’re in perfect alignment. Avoid having your knee extend over your toes, as it can create additional pressure on your joints. To correct this, you can move your saddle horizontally.
- Now that you’ve got your saddle in position, you can check your handlebar height. It should be leveled or slightly higher than your saddle for Veloburn. For Velobeat it should be higher than your saddle by a few centimeters.
- Rise up from your saddle and check if you’ve got enough space from your knees to the handlebar – if not, you can always adjust that by moving your handlebar horizontally.
Make sure you can still maintain an upright position and you’re not leaning too far on your handlebars
View this post on Instagram
BASE RESISTANCE
During the ride, you want to make sure that you go down to the base resistance unless otherwise instructed by your coach. Your base resistance will change, not only from ride to ride but also during the workout as well.
So how do you find your base resistance? Make sure your blue resistance knob and the power shift are all the way to the left, and while pedaling give it a few turns to the right. Once you start feeling slight resistance under your feet, like riding a flat road – that’s your base. It is totally based on how strong you feel that day and how much you want to push yourself. Don’t ever be afraid to adjust your base resistance during the ride, it will vary!
POWER SHIFT
A power shift is a black lever on top of your blue resistance knob. It has three positions (left, middle and right) and can be used to add or take away bigger amounts of resistance instantaneously. It is a perfect tool to use when doing intervals and sprints and will make adding or taking away that extra resistance so much easier.
BIKE CONSOLE
For our Velobeat workouts, you don’t need to turn on the console at all, as it’s all about riding to the beat of the music. That being said, for Veloburn, the console is a crucial component of the workout.
So first things first – to turn on your bike console, simply press any button. A “begin pedaling” prompt will pop up on the screen because your power generates the console. Once you’ve pedaled for a few moments, the “warm up mode” will be enabled. But to receive all your data points, you’ll want to enter the workout mode called “Stage 1” – to do that, simply press the middle button / stage button on the console.
Now, what’s important for a Veloburn workout, is the second number on the left, the RPM (Pedaling cadence in revolutions per minute). This is what you will hear the coaches referring to throughout the workout.
View this post on Instagram
This is the most crucial aspect to understand in order to have a great and efficient workout. If you’re into numbers and are interested in your performance, you’ll find more details on the console below.
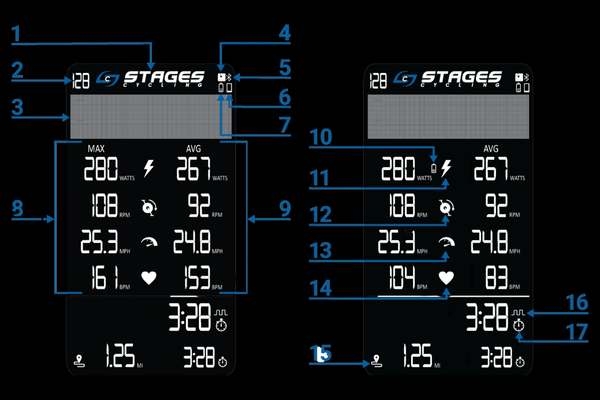
1 Stages logo- Stages Cycling logo.
2 Bike number – An assigned identification number that corresponds to the bike a console is paired to.
3 Message banner – Displays text messages indicating the current mode or stage, metrics, and settings menus.
4 ANT icon – The ANT+ logo appears in the top right corner when connected to a sensor using ANT+.
5 Bluetooth icon – The Bluetooth logo appears in the top right corner when connected to a sensor using Bluetooth.
6 Console battery – The battery icon appears in the top right corner when the console battery level is below 20%.
7 Phone icon – The phone icon appears in the top right corner when connected to a smart phone or tablet.
8 MAX – Maximum values for active metrics in Stage (Workout), Ride and Results modes.
9 AVG – Average values for the current stage or the entire ride.
10 Sensor battery – The battery icon appears next to the sensor icon (ie., power, heart rate) when the sensor battery level is below 20%.
11 Power (lightning) – Power output in WATTS — instantaneous, average, and maximum.
12 Cadence (cranks) – Pedaling cadence in revolutions per minute (RPM) —instantaneous, average, and maximum.
13 Speed (speedometer) – The speed icon indicates that the fields adjacent are displaying speed.
14 Heart rate (heart) – Heart rate (BPM) is only active when a rider is wearing a compatible heart rate sensor (not included), displays the heart rate—instantaneous, average, and maximum.
15 Stage Distance – The distance traveled in miles (MI) or kilometers (KM) for the stage.
16 Interval – The interval icon is visible when stage time is displayed.
17 Stage time – The elapsed time for the stage.
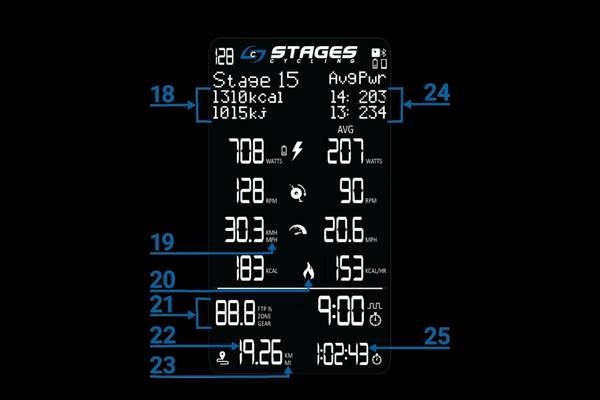
18 Kcal/kj – Cumulative kilocalories and kilojoules burned per stage or ride.
19 MPH/KMH Calculated speed in miles per hour (MPH) or kilometers per hour (KMH).
20 Kcal (flame) – The cumulative kilocalories (KCAL) value during the ride, displayed when not connected to a heart rate monitor.
21 GEAR/ZONE/FTP% – Displays Gear, Zone, or FTP% dependent on which profile is active.
22 Total ride distance – Total distance traveled during a workout, displayed in miles (MI) or kilometers (KM).
23 MI/KM – Distance traveled during a stage, displayed as miles (MI) or kilometers (KM).
24 Previous stage metric – Values from the previous two stages for a selected metric (see Display Settings).
25 Total ride time – The elapsed time for the entire ride.
If you’re ever unsure or interested to learn more, feel free to approach our front desk staff or a coach and we’ll be happy to assist you.
So, are you ready for a ride?


3 Ways to Push Through a Tough Workout
/in Health, Lifestyle, Living in Zug, Living in Zurich, Power, Rides/by CaseyMeet Your New Power Coach, Julia
/in Health, Lifestyle, Living in Zug, Living in Zurich, Power, Rides/by CaseyWhy Breakfast Matters: Fueling Your Day the Right Way
/in Health, Lifestyle, Living in Zug, Living in Zurich, Power, Rides/by Casey